How to install a MotoXcycle Internal Throttle.
Share
|
MotoXcycle Throttle |
|
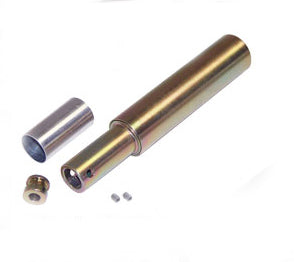
This isn’t a difficult one but it takes slow time and effort. I handled this in two phases. First I cut the bars and drilled them, even taped the holes. Then I sent the bar to powder. Finally the assembly occurred. There’s something about an internal throttle assembly that’s bothersome. It’s a delicate operation that you don’t want to mess up. Here are some considerations: You don’t want to break a throttle cable on the road. Nasty breakdown. You don’t want to snag a throttle anytime and have the throttle catch wide open. You don’t want to cut the internal throttle cable too long or two short. One is a pain, the other makes you dig for another cable. You don’t want to cut the exterior housing too long or short. Same reasons as above. You need to test the length of the cable against the swing of the bars. This can’t be tested too often. Make sure the cable doesn’t snag or kink on any obstruction. With those rules in mind I went to work. These rules apply to any throttle cable application, but generally you don’t need to cut and size cables. This particular internal throttle came from: MotoXcycle.com First I read the directions, reviewed the technical drawing and went looking for cables to mess with. I knew chances were that I’d screw up at least one cable, so I found an old set of Mikuni push pull cables. I could use either one. Tools Required 3/32 and 1/16 Allen keys Okay, before the bars were shipped off to powder coat I started the process. Here’s how the MotoXcycle instructions read: Position and loosely fasten all controls and housings in order onto 1-inch o.d. bar ends. Do not forget to include grip length. Note: any extra length of bar to be removed. Length may vary depending on parts selected. Squarely cut bar ends to size if necessary. Not sure I understand all that? I narrowed my bars on either side 2 inches, because I could and the lightness of the handling allowed me to have narrow lane-splitting bars. Other than that the only distance you can cut your bars is 4 inches for the internal system. However, there can be no bends immediately after the 4-inch cut or the system can’t slide into the bar. Here’s step two according to MotoXcycle: After bar ends are cut to size, measure 4 inches in from the end of the bar on the throttle side only, mark off your cut line. Measure it again and then make your cut as squarely as possible from the throttle side bar end only. This will allow space for the internal throttle assembly. This was exactly correct and I followed it to the letter. Next: On the throttle side of the handlebar measure 1 7/16-inch in from the bar end and center punch the bar. Drill completely and squarely through the tubing with a #21 drill bit. Tap the holes with a 10-32 tap. (Shim included for thin wall bars must also be drilled where required.) This is cool, except for a couple of items. It’s difficult to drill squarely through tubing. I even have a tubing cradle for drilling round stock. I gave it my best shot. The shim is to be used if your bars are thinner wall than some others. I needed the shim. Step four is next: Choose a routing path for the throttle cable. (If wire type cable is used, lightly solder cable at throttle end to avoid fraying) Seat outer cable housing in the cable button with 1/16 Allen key. Tighten setscrew in the button to secure (not crush) cable housing. Extend cable wire into puller. Tighten setscrew on puller to bite cable tightly. Push both parts back into the handlebar until the groove in the cable button aligns underneath the tapped 10-32 screw holes in the bar end. Install screws and tighten down, making certain they’ve entered the retaining groove in the cable button. Okay, this is all fine except for a couple of items. Routing is critical. I bored a couple of ½ inch holes under the bars in the center then beveled and emery sanded the path for the least resistance and wear and tear on the cable housing. Then I sent the bars to the powder coater for a weird copper patina finish. I wanted everything on the bike to look like bare metal. Here’s the cable button. I’m still not sure if I tightened this setscrew too much. I’ll check it soon. When the bars returned from the powder master and I was ready to install them, then I set them in the Custom Cycle Engineering traditional dog bone risers and started to figure the length of cable, routing, position and adjustment. This internal throttle system is cool with needle bearings that will last forever, but there’s also no throttle cable adjustment, so you need to work one into the cable housing or at the carburetor. It’s not a bad notion to set it in the center of the adjustment to allow you some flexibility. Although, I believe I set it at the shortest length. Here’s a Mikuni Carb cable end. I measured the length and played with the way the throttle cable would turn and fit into the Rivera guide for Mikuni carbs. They developed a system, guides and throttle wheel to allow a Mikuni (42 mm) to be used on Shovelheads without interfering with the crossover oil line between the heads. Above, the shot shows the throttle wheel, then there’s the shot of the cable adjuster. It’s key to position it so that it won’t run into the carb, end up inside the bars or in some other awkward position. This is the hole in the bars where the 10-24 or 32 setscrew resides. It goes all the way through the shim, the throttle housing and into the groove in the button. Unfortunately and fortunately the grip housing is hardened steel. If you didn’t drill the bar holes exactly you can’t bore out the holes in the mechanism. Re-drill the bars. One of these days I’ll take the whole thing apart and see how it’s doing. I oiled the hell out of the cable and greased all components of the internal throttle, as if I was going to ride the bike to the moon and back. I like to build to last. I only adjusted the throttle once on the way to Sturgis. I ran E-grips from Custom Chrome, a new Ergonomic set of rubber grips for less hand strain and pressure to pull the throttle. If you run solid grips here’s the instructions: Measure ¼ -inch in from the grip end and center punch. Fit the grip of your choosing over the throttle and drill completely and squarely through the grip and housing with a #21 bit. Tap the grip using 10-32 tap and install setscrews. This may answer one of my questions. I didn’t run solid grips, but rubber E-grips. So I slid it over the throttle and it drags on the bar for ½ an inch. I smeared some grease on the bar and it worked all the way to Deadwood. Here’s a final comment from the MotoXcycle: It may be necessary to lightly file the end of the bar so that the setscrews will enter the recess into the cable button. Be careful not to take too much off, as this will result in excessive play in the throttle, that you cannot undo. File down slowly to a perfect fit. I didn’t file at all. I let the setscrew protrude slightly and ran my Joker Machine controls right up against it. There you have it. State-of-the-art internal throttle for a clean look. I got me to Sturgis. So far so good. Here's a shot of the E-grip in place after the Sturgis run next to the Joker Machine controls. Still working like a champ. |